

Adding a size guide to your Shopify store is easy and essential. It helps customers choose the right size, reducing returns and increasing satisfaction.
In online shopping, a size guide is a must-have feature. It gives customers confidence in their purchase. They know what size to pick, which boosts their shopping experience. For store owners, fewer returns mean more profit and happier customers. This guide will show you the steps to add a size guide on Shopify.
It’s a simple process that can make a big difference. Let’s get started to improve your store and customer satisfaction.
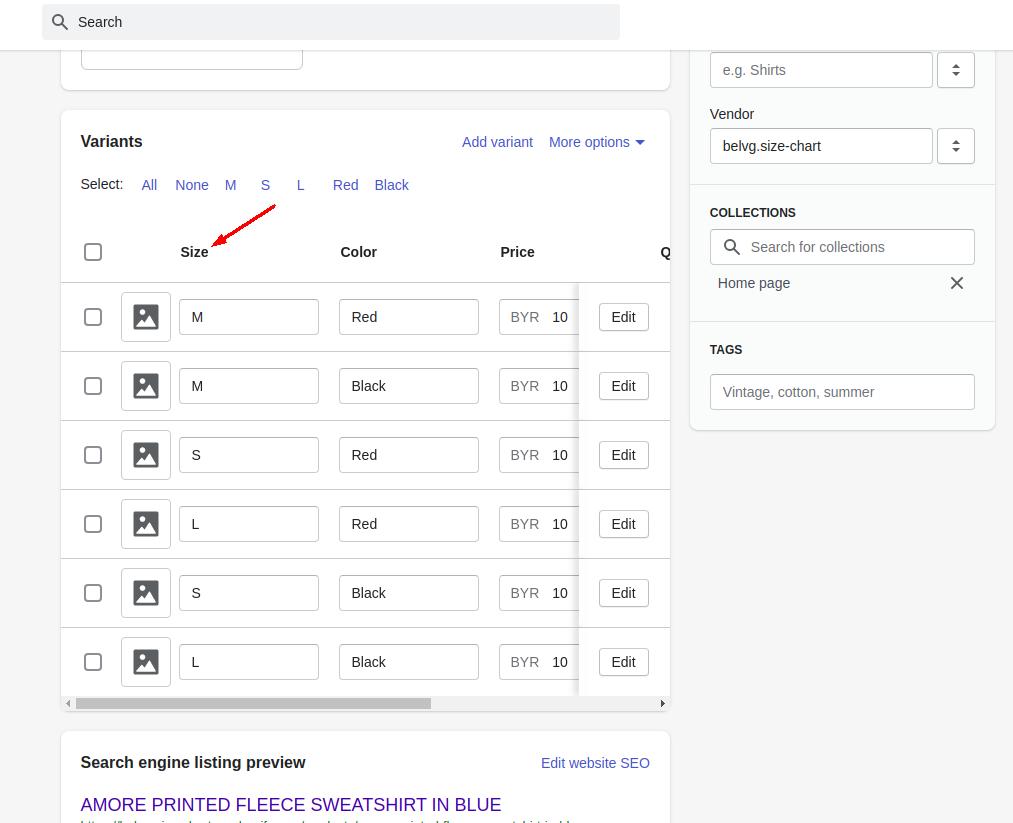
Credit: belvg.com
Benefits Of Adding A Size Guide
Adding a size guide to your Shopify store has multiple benefits. It can greatly improve customer satisfaction and reduce the likelihood of returns. In this post, we will discuss the key benefits of adding a size guide, focusing on enhancing customer experience and reducing return rates.
Enhancing Customer Experience
A size guide helps customers choose the right size. This reduces confusion and frustration. Here are a few ways a size guide can enhance customer experience:
- Clear Information: Customers get exact measurements. This helps them make informed decisions.
- Visuals: Charts and images can make it easier to understand.
- Reduce Uncertainty: Customers feel more confident in their purchase. This increases their satisfaction.
Adding a size guide shows that you care about your customers. This boosts trust and loyalty.
Reducing Return Rates
Returns can be costly for any online store. A size guide can help reduce these costs. Here is how:
- Accurate Orders: Customers order the right size the first time. This reduces the need for returns.
- Less Frustration: Customers are happier with their purchase. Happy customers are less likely to return items.
- Lower Costs: Fewer returns mean less shipping and handling costs. This saves you money.
Overall, adding a size guide helps you save money and keep customers happy.
Preparation Steps
Adding a size guide to your Shopify store can help reduce returns and improve customer satisfaction. Before you create your size guide, follow some preparation steps. These steps will ensure you provide accurate and easy-to-understand information for your customers.
Gathering Size Information
The first step is to gather accurate size information. Measure the products you sell. Note measurements like chest, waist, hips, and inseam. Use a flexible tape measure for this task. Record each measurement carefully. Consistency is key to avoid confusion.
If you source products from manufacturers, ask for their size charts. Verify the provided measurements by comparing them with actual products. Ensure all information is reliable. This helps build trust with your customers.
Choosing A Size Guide Format
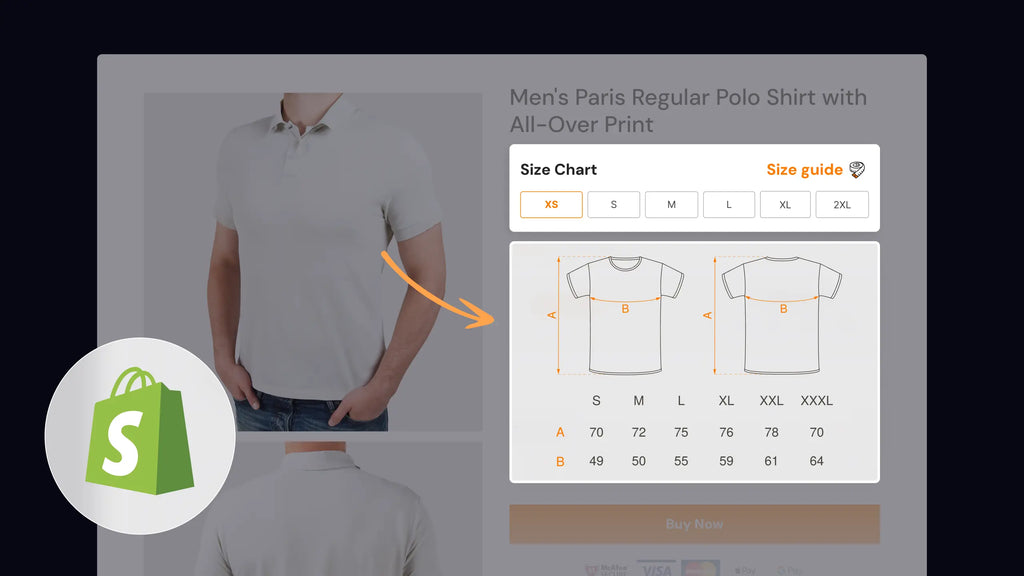
Next, decide on the format for your size guide. You can use tables, diagrams, or simple text descriptions. Tables are popular because they organize information clearly. They allow customers to compare different sizes easily.
Diagrams can be very effective too. Use images to show where to measure. This visual aid can help customers understand the measurements better. Simple text descriptions can also work. They are easy to create and can be very clear.
Choose the format that best suits your audience. Keep it simple and straightforward. The goal is to make the size guide easy to use and understand.
Creating A Size Guide
Creating a size guide is essential for any Shopify store. It helps customers find the right fit and reduces return rates. By offering clear and accurate size information, you can enhance the shopping experience. Here’s how you can create a size guide using Shopify’s built-in tools or third-party apps.
Using Shopify’s Built-in Tools
Shopify offers built-in tools to create and display a size guide. These tools are user-friendly and do not require technical expertise.
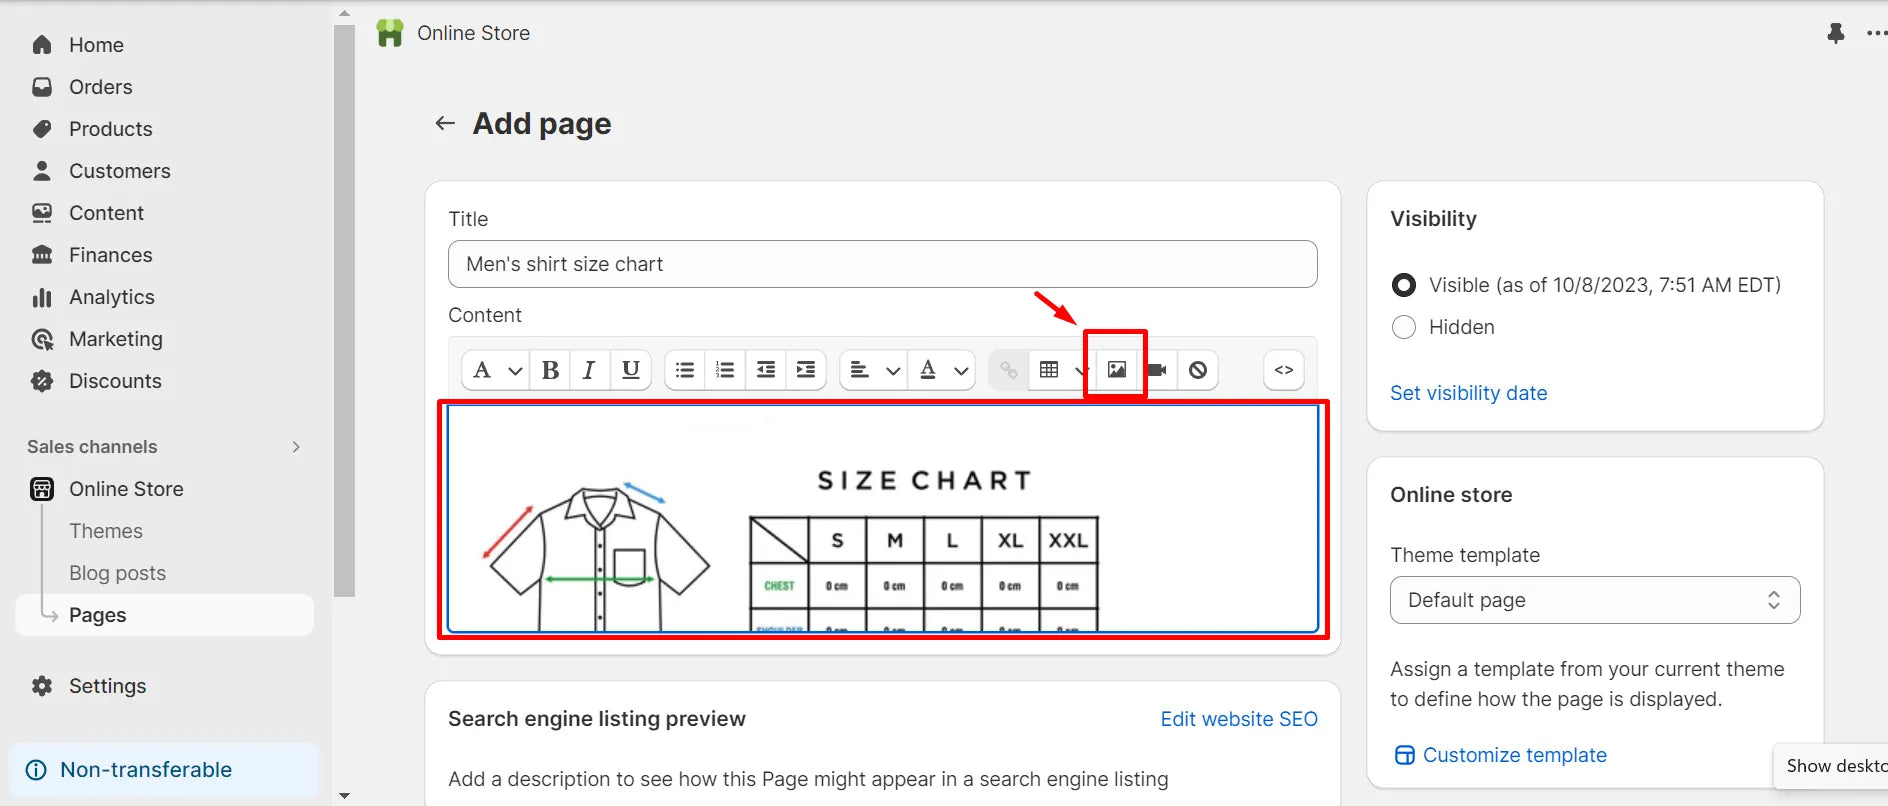
- Create a Size Chart Page: Go to Online Store > Pages. Click Add page and name it “Size Guide”.
- Add Your Size Information: Use tables to display size measurements. For example:
| Size | Bust (inches) | Waist (inches) | Hips (inches) |
|---|---|---|---|
| Small | 34-35 | 26-27 | 36-37 |
| Medium | 36-37 | 28-29 | 38-39 |
| Large | 38-39 | 30-31 | 40-41 |
- Embed the Size Chart: To display this guide, edit the product pages. Add a link to the “Size Guide” page you created.
Using Third-party Apps
If you need more advanced features, consider using third-party apps. These apps offer customization and interactive size guides.
- Kiwi Size Chart: This app allows you to create detailed size guides. It offers customization options and integrates easily with Shopify.
- Size Matters: A free app that helps you build simple yet effective size charts. You can customize the look and feel to match your store.
To install these apps:
- Go to the Shopify App Store.
- Search for the app by name.
- Click Add app and follow the installation steps.
After installation, follow the app’s instructions to create and embed your size guide.
Using these tools and apps, you can ensure your customers find the perfect fit every time.
Credit: gempages.net
Designing Your Size Guide
Designing your size guide on Shopify is essential for customer satisfaction. A well-designed size guide helps shoppers choose the right size. This reduces returns and enhances the shopping experience. Below, we will discuss how to design your size guide effectively.
Customizing The Layout
Start by choosing a simple and clear layout. Use tables for easy comparison. Ensure the text is readable and not too small. Break the information into sections. This helps customers find what they need quickly.
Consider using visual aids. Images or diagrams can clarify measurements. These additions make your size guide more user-friendly. Ensure your layout is mobile-friendly. Many customers shop on their phones.
Incorporating Brand Elements
Your size guide should reflect your brand. Use your brand colors and fonts. This keeps your site consistent. Add your logo to the size guide page. It adds a professional touch.
Include any unique sizing information. If your brand uses custom sizing, explain it clearly. Provide tips for measuring. This helps customers get accurate results. Personalize the guide with your brand’s voice. This enhances the shopping experience.
Adding The Size Guide To Your Store
Adding a size guide to your Shopify store can improve customer satisfaction and reduce returns. It provides essential information about product sizing, ensuring customers make informed decisions. This guide will show you how to add a size guide to your store.
Embedding In Product Pages
To embed a size guide directly in your product pages, follow these steps:
- Log in to your Shopify admin panel.
- Navigate to Online Store > Themes.
- Click Actions and select Edit code.
- In the Templates section, find and select product.liquid.
- Insert the following code where you want the size guide to appear:
Size Guide
[Insert your size guide details here]
Ensure the size guide content is clear and easy to understand. Using tables can help:
| Size | Chest (inches) | Waist (inches) |
|---|---|---|
| Small | 34-36 | 28-30 |
| Medium | 38-40 | 32-34 |
| Large | 42-44 | 36-38 |
Linking In Navigation Menus
To link your size guide in the navigation menu, follow these steps:
- In the Shopify admin panel, go to Online Store > Navigation.
- Select the menu where you want to add the size guide link.
- Click Add menu item.
- Enter a name for the link, such as Size Guide.
- In the Link field, select Pages and choose your size guide page.
- Click Add, then Save menu.
This will place a visible link to your size guide in the chosen navigation menu. Easy for customers to find!
Testing The Size Guide
After setting up your size guide on Shopify, it’s crucial to test it. This ensures that your customers get accurate information and have a smooth shopping experience. Here are some steps you can follow:
Ensuring Mobile Compatibility
Many users shop on their phones. Your size guide must be mobile-friendly. Test it on various devices to see how it looks and functions.
- Check the size guide on both Android and iOS devices.
- Ensure the text is readable without zooming.
- Verify that images and tables are not cut off.
- Ensure that the guide loads quickly.
Mobile compatibility can significantly affect customer satisfaction. A well-functioning mobile size guide can reduce returns and enhance user experience.
Gathering Customer Feedback
Customer feedback is invaluable. It helps you improve your size guide. Ask your customers about their experience.
- Use email surveys to gather feedback.
- Add a feedback form on your website.
- Check reviews and comments for size-related feedback.
Consider implementing a simple table to organize feedback:
| Feedback Type | Comments |
|---|---|
| Positive | Easy to understand, helpful images |
| Negative | Text too small, images unclear |
Address common issues to improve your size guide. This ensures that your guide meets customer needs and expectations.
Promoting Your Size Guide
Promoting your size guide effectively can significantly enhance your customer’s shopping experience. It ensures they select the right size, reducing returns and increasing satisfaction. Here’s how to make your size guide more visible:
Highlighting In Marketing Emails
Include a link to your size guide in your marketing emails. Add a bold, clear call-to-action (CTA) like “Check Your Size”. This reminds customers to verify their size before purchasing.
In your email footer, add a brief note: “Need help with sizing? Check our size guide!”. This ensures your size guide is always visible.
For promotional emails, use a table to display popular items with a size guide link. For example:
| Product | Size Guide |
|---|---|
| Summer Dress | View Size Guide |
| Men’s Jeans | View Size Guide |
Featuring On Social Media
Post about your size guide on social media platforms. Create engaging posts like: “Struggling with sizes? Our size guide can help!” Include a direct link to the guide.
Use high-quality images showing how to measure yourself. This visual aid helps customers understand the sizing process better.
In your Instagram stories, add a swipe-up link to the size guide. For platforms like Facebook, pin a post with the size guide link at the top of your page.
Use bullet points to highlight the benefits:
- Reduces return rates
- Increases customer satisfaction
- Improves shopping experience
Encourage customers to share their sizing tips and experiences. User-generated content boosts trust and engagement.
Credit: gempages.net
Maintaining Your Size Guide
Maintaining your size guide on Shopify ensures your customers always have accurate information. Keeping it up-to-date helps reduce returns and improves customer satisfaction. It also keeps your store looking professional. Let’s explore how to maintain your size guide effectively.
Updating Size Information
Regularly check your size guide for accuracy. Styles and fits may change with new collections. Ensure measurements match the latest products. If you switch suppliers, update the size guide. Accurate sizes build trust with your customers. They feel confident purchasing from your store.
Set a schedule to review your size guide. Monthly checks can keep everything current. Update immediately if you notice discrepancies. Use customer feedback to identify issues. This proactive approach prevents potential problems.
Monitoring Performance Metrics
Track how often customers view your size guide. High views may indicate sizing concerns. Use Shopify analytics to monitor these metrics. If customers frequently return items, review your size guide. Incorrect sizes may be the culprit.
Analyze return reasons for patterns. Size-related returns signal a need for updates. Also, check if customers ask sizing questions often. This data helps improve your size guide. Better information leads to fewer returns and happier customers.
Frequently Asked Questions
What Is A Size Guide On Shopify?
A size guide on Shopify helps customers choose the right product size. It reduces returns and improves satisfaction.
How Do I Create A Size Guide?
To create a size guide, go to Shopify admin, select “Online Store,” then “Pages. ” Add a new page with size details.
Can I Customize The Size Guide?
Yes, you can customize the size guide. Use HTML or third-party apps to match your store’s theme.
Why Is A Size Guide Important?
A size guide is important because it helps customers find the right fit. This reduces returns and increases sales.
Conclusion
Adding a size guide to your Shopify store is simple. It helps customers find the right fit. This can reduce returns and increase satisfaction. Use clear instructions and visuals. Customize your size guide to match your brand. Regularly update it for accuracy.
A good size guide can boost your sales and customer trust. Start today and improve your online store. Happy selling!
