
Canceling your Bluehost hosting account may seem daunting, but it’s quite straightforward. Follow a few steps, and you’ll be done in no time.
Many users find themselves needing to cancel their Bluehost hosting for various reasons. Maybe you’re switching to a new provider or no longer need the service. Whatever your reason, it’s important to understand the process to avoid any confusion. In this blog post, we’ll guide you through each step of canceling your Bluehost hosting account.
By the end, you’ll know exactly what to do and what to expect. Let’s get started!
Credit: www.hostinger.com
Reasons To Cancel Bluehost
There can be many reasons to cancel your Bluehost hosting. Your needs may have changed, or you might be seeking better options. Understanding these reasons can help you make an informed decision. Here are some common reasons users decide to cancel their Bluehost hosting plan.
Cost Considerations
Bluehost may not fit your budget anymore. Hosting costs can add up, especially if you run multiple websites. You might find cheaper alternatives that offer similar or better features. Saving money on hosting can help you allocate resources elsewhere.
Service Issues
Service quality can influence your decision to cancel. Frequent downtimes can hurt your website’s performance. Slow loading speeds can frustrate your visitors. Poor customer support can leave you feeling stranded. Reliable hosting is crucial for a smooth online experience.
Switching Providers
You might find another provider that better suits your needs. Newer hosts may offer advanced features or better performance. Switching providers can bring fresh benefits and improved services. Always compare options before making a switch.
Backing Up Your Data
Before you cancel your Bluehost hosting, it’s crucial to back up your data. This ensures you don’t lose important files, databases, and settings. Backing up your data can be done in several ways. Let’s explore the different methods below.
Manual Backup
A manual backup involves downloading your website files directly from your hosting account. Follow these steps:
- Log in to your Bluehost control panel.
- Navigate to the File Manager section.
- Select the files or directories you want to back up.
- Click the Download button to save them to your computer.
Don’t forget to download your databases as well. Go to phpMyAdmin, select your database, and click Export.
Using Plugins
Plugins can automate the backup process. They are especially useful for WordPress sites. Popular plugins include:
- UpdraftPlus
- BackupBuddy
- Duplicator
Here’s how to use a plugin like UpdraftPlus:
- Install and activate the UpdraftPlus plugin.
- Go to Settings > UpdraftPlus Backups.
- Click Backup Now.
- Wait for the backup process to complete.
After the backup, download the files to your computer.
Downloading Files
Another way to back up your website is by downloading files directly. This is useful if you have a lot of media files. Follow these steps:
- Open an FTP client like FileZilla.
- Connect to your Bluehost server using your FTP credentials.
- Navigate to the public_html directory.
- Select and download all the files to your local machine.
Ensure you download all necessary files, including media, themes, and plugins.
Backing up your data is a crucial step before canceling your Bluehost hosting. It ensures you can easily restore your site on a new host. Choose the method that best suits your needs and technical skills.
Understanding Bluehost’s Refund Policy
Cancelling your Bluehost hosting plan can seem daunting. Understanding Bluehost’s refund policy will make the process smoother. This section will guide you through the key aspects of their refund policy.
Money-back Guarantee
Bluehost offers a 30-day money-back guarantee. If you cancel within this period, you get a full refund. This guarantee applies to hosting plans only. Domain fees and other services are not included. Make sure to request the cancellation within the 30 days.
Pro-rated Refunds
If you cancel after 30 days, you may get a pro-rated refund. This means you will receive a partial refund for unused time. The refund amount depends on how long you have used the service. Contact Bluehost support to get the exact amount.
Non-refundable Services
Some services are non-refundable. Domain names, for example, are not refundable. If you bought domain privacy or other add-ons, these are also non-refundable. Keep this in mind before you purchase additional services.
Credit: www.hostinger.co.uk
Accessing The Bluehost Dashboard
Canceling your Bluehost hosting is a straightforward process. The first step is to access the Bluehost dashboard. This guide will help you navigate the steps easily. Follow along to ensure a smooth experience.
Logging In
To begin, you need to log in to your Bluehost account. Visit the Bluehost website and locate the login button at the top right corner.
- Click on the login button.
- Enter your username and password.
- Click the blue Submit button.
Once logged in, you will be directed to your Bluehost dashboard.
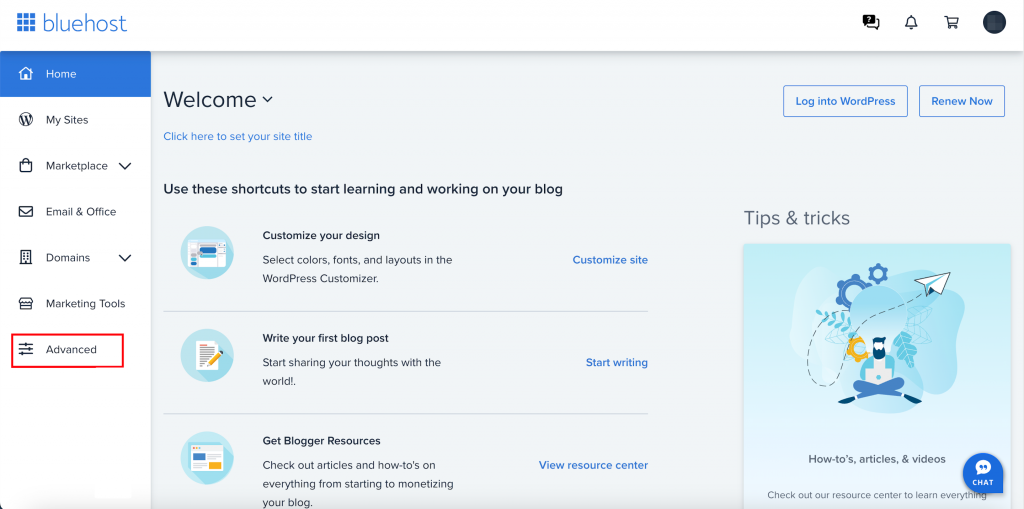
Navigating The Interface
The Bluehost dashboard is user-friendly. The main menu is on the left side. Here, you will find all the necessary options.
| Menu Item | Description |
|---|---|
| Home | Overview of your account. |
| My Sites | Manage your websites. |
| Marketplace | Purchase additional services. |
| Email & Office | Set up email accounts. |
| Domains | Manage your domain names. |
Familiarize yourself with these options. You will need to access some of them later.
Finding Account Settings
Next, locate your account settings. This is where you can manage your subscription and cancel your hosting.
- Click on your profile icon at the top right corner.
- Select Account Settings from the dropdown menu.
- In the Account Settings, find the Billing section.
In the Billing section, you will see options to manage your payment methods and subscriptions. Here, you can cancel your hosting plan.
Remember, accessing the Bluehost dashboard is the first step. Each section is designed to be intuitive. Follow these steps, and you will navigate the dashboard with ease.
Initiating The Cancellation Process
Initiating the cancellation process with Bluehost is straightforward. This guide will help you navigate the steps. Read on to learn how to locate the cancellation option, fill out the form, and submit your request.
Locating The Cancellation Option
First, log into your Bluehost account. Next, navigate to the ‘My Products’ tab. Find your hosting plan listed there. Click the ‘Options’ button next to it. A dropdown menu will appear. Select ‘Cancel Subscription’ from the list.
Filling Out The Cancellation Form
After selecting ‘Cancel Subscription’, a form will appear. This form requires details such as your reason for canceling. Choose the most accurate option. You may also need to provide additional comments. Fill in all required fields carefully.
Submitting Your Request
Once you complete the form, review your entries. Ensure all information is correct. Then, click the ‘Submit’ button. You will receive a confirmation email shortly. Keep an eye on your inbox for this important email.

Credit: www.wikihow.tech
Confirming Your Cancellation
After you’ve initiated the cancellation of your Bluehost hosting, it’s important to confirm the cancellation process. This ensures that you won’t be billed for services you no longer need. Here’s how to confirm your Bluehost cancellation effectively.
Receiving Confirmation Email
First, check your email for a confirmation message from Bluehost. This email will confirm that your cancellation request has been received. It may take a few minutes to arrive. If you don’t see it in your inbox, check your spam or junk folder.
Checking Account Status
Next, log in to your Bluehost account. Navigate to the account settings or billing section. Check the status of your hosting plan. It should indicate that your cancellation is in process or completed. This step is crucial to ensure that your request has been properly recorded.
Ensuring Services Are Terminated
Finally, verify that all services related to your hosting have been terminated. This includes any additional services like domain privacy, email accounts, or site backups. Double-check these areas to ensure you are not charged for any residual services.
Confirming your cancellation with Bluehost is a straightforward process. Follow these steps to ensure you are no longer billed and your hosting services are fully terminated.
Potential Issues And Troubleshooting
Cancelling a Bluehost hosting account can sometimes be tricky. You might face several issues during the process. Understanding these problems and how to solve them is important. Let’s dive into some common problems and their solutions.
Common Problems
Many users report trouble finding the cancellation option. Bluehost’s interface can be confusing. Another common issue is billing. Some users still get charged after cancellation. This can be frustrating. Also, data backup can be a challenge. Ensure your data is safe before canceling.
Contacting Support
If you face any issues, contacting Bluehost support is a good idea. They offer live chat, phone, and email support. Live chat is often the quickest. Explain your issue clearly. Provide any necessary details. This helps them solve your problem faster.
Escalating Complaints
If support doesn’t help, escalate your complaint. Ask for a higher-level representative. Be polite but firm. Explain your problem in detail. Provide all previous communication. This shows you have tried resolving the issue. It may speed up the process.
Exploring Alternative Hosting Options
Thinking of canceling your Bluehost hosting? Exploring other hosting options can help find the right fit for your needs. Let’s break down the steps to make the best choice.
Comparing Competitors
Start by comparing other hosting providers. Look at popular names like SiteGround, HostGator, and GoDaddy. Each offers unique features and price points. Read user reviews to get real-world opinions.
Evaluating Features
Next, evaluate the features each host offers. Check for storage space, bandwidth, and uptime guarantees. See if they provide easy-to-use control panels and good customer support. Consider if they offer free domain names or site migration.
Making The Switch
Once you find a new host, it’s time to make the switch. Back up your website data first. This ensures nothing gets lost. Then, follow the new host’s instructions to transfer your site. Contact their support team if you need help. They are there to assist you.
Frequently Asked Questions
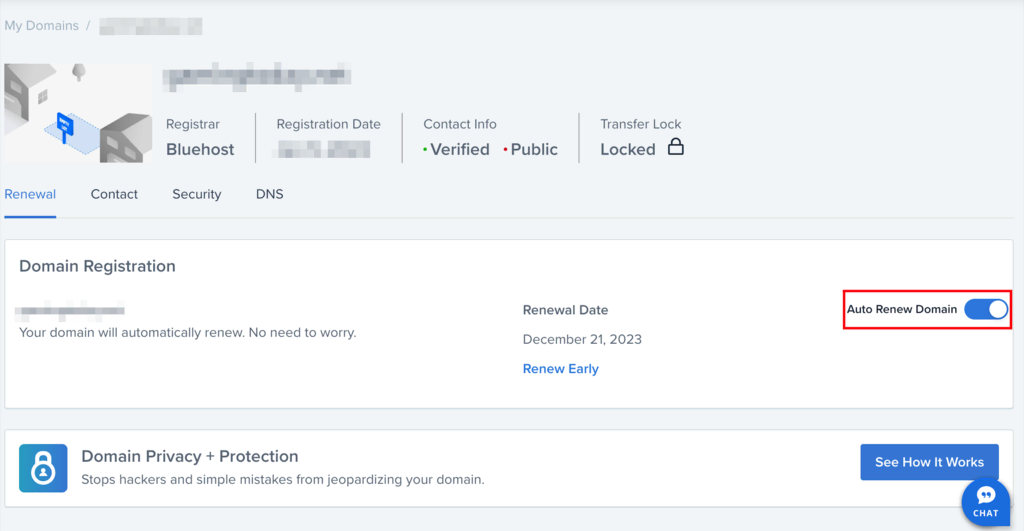
How To Cancel My Bluehost Hosting Plan?
To cancel your Bluehost hosting plan, log into your Bluehost account. Navigate to the ‘Account’ tab. Select ‘Renewal Options’ and then choose ‘Do Not Renew’. Confirm your cancellation request.
What Are Bluehost Cancellation Fees?
Bluehost does not charge any cancellation fees. However, domain registration fees are non-refundable. Ensure you understand the terms before canceling.
Can I Get A Refund From Bluehost?
Yes, Bluehost offers a 30-day money-back guarantee. If you cancel within 30 days, you can get a full refund.
How Long Does Bluehost Cancellation Take?
Bluehost cancellations are processed immediately. However, it might take a few days for the refund to appear in your account.
Conclusion
Canceling your Bluehost hosting is easier than you might think. Follow the steps outlined, and you’ll be done in no time. Remember to back up your data. This ensures no loss of important files. Contact customer support if you need further help.
They are always ready to assist. Now, you can move forward with confidence. Adjust your hosting to better fit your needs. Happy hosting!
