

You can use Hostinger email in Gmail easily. This integrates Hostinger’s robust email services with Gmail’s familiar interface.
Many people prefer using one email interface to manage all their accounts. By linking your Hostinger email to Gmail, you can streamline your email management. This integration lets you enjoy Gmail’s features while using your Hostinger email address. It’s efficient and convenient, especially for those who handle multiple email accounts.
This guide will walk you through the steps to set this up. By the end, you’ll know how to send and receive Hostinger emails directly within Gmail. Let’s simplify your email life and get started!
Introduction To Hostinger Email
Hostinger Email is a reliable service for managing your professional emails. It offers a user-friendly experience and integrates smoothly with other platforms. You can use Hostinger Email to maintain a professional image and keep your communications organized.
Hostinger Email Features
Hostinger Email comes with various features. These features enhance your email experience and streamline your workflow. Here are some of the key features:
Custom Domain: Use your own domain name for your email addresses. This makes your business look more professional.
Spam Protection: Hostinger Email includes robust spam filters. These filters keep unwanted messages out of your inbox.
Storage: It offers ample storage space for your emails and attachments. You won’t have to worry about running out of space.
Webmail Access: Access your email from anywhere using Hostinger’s webmail interface. This is convenient for users who are on the go.
Benefits Of Using Hostinger Email
Using Hostinger Email has several benefits. These benefits can help improve your email management and communication.
Professionalism: A custom email domain enhances your business credibility. It shows that you are serious about your professional image.
Security: Hostinger Email provides high-level security features. This ensures your emails are safe from threats.
Ease of Use: The platform is intuitive and easy to navigate. You can manage your emails without any technical difficulties.
Support: Hostinger offers excellent customer support. You can get help whenever you need it.
Setting Up Hostinger Email
Setting up Hostinger email in Gmail can streamline your communication. By consolidating your emails, you can manage everything in one place. Below, we’ll guide you through the process of setting up Hostinger email.
Creating A Hostinger Email Account
First, log in to your Hostinger account. Navigate to the Email section. Click on “Create a New Email Account”. Enter your desired email address and password. Make sure your password is strong. Click “Create” to finalize your email setup. Now you have a Hostinger email account ready.
Configuring Email Settings
Open your Gmail account. Click on the gear icon and select “See all settings”. Go to the “Accounts and Import” tab. Under “Check mail from other accounts”, click “Add a mail account”. Enter your new Hostinger email address. Click “Next”.
Select “Import emails from my other account (POP3)”. Click “Next”. Enter your full Hostinger email address and password. For the POP Server, use “mail.hostinger.com”. Set the Port to 995. Check the option “Always use a secure connection (SSL)”. Click “Add Account”.
To send emails from Gmail using your Hostinger address, select “Yes, I want to be able to send mail as [your email]”. Click “Next”. Enter your name and click “Next Step”. For SMTP Server, use “smtp.hostinger.com”. Set the Port to 465. Check “Secured connection using SSL”. Enter your Hostinger email and password again. Click “Add Account”.
Gmail will send a verification email to your Hostinger account. Open the email and click the verification link. Now, you can send and receive Hostinger emails in Gmail.
Accessing Gmail Settings
Integrating your Hostinger email with Gmail can streamline your communication. It allows you to manage all your emails in one place. This guide will walk you through accessing Gmail settings to set up your Hostinger email.
Opening Gmail Settings
First, open your Gmail account. Look for the gear icon in the top-right corner. Click on it to open the Quick settings menu. From there, select See all settings. This will take you to the main settings page.
Navigating To Accounts And Import
Once in the settings, you’ll see several tabs at the top. Click on the Accounts and Import tab. This is where you can add your Hostinger email account.
| Step | Action |
|---|---|
| 1 | Open Gmail and click the gear icon. |
| 2 | Select See all settings. |
| 3 | Click on the Accounts and Import tab. |
In the Accounts and Import tab, you can manage your email accounts. Look for the section labeled Check mail from other accounts. Click on Add a mail account. Follow the prompts to input your Hostinger email details. Gmail will guide you through the process.
By following these steps, you can easily integrate your Hostinger email with Gmail. Managing multiple email accounts becomes simpler and more efficient.

Credit: www.youtube.com
Linking Hostinger Email To Gmail
Linking Hostinger Email to Gmail can simplify your email management. You get all your messages in one place. This setup makes it easy to handle both personal and professional emails. Follow these steps to link your Hostinger Email to Gmail.
Adding A New Email Account
First, open your Gmail account. Look at the top right corner and click on the gear icon. Select “See all settings” from the dropdown menu. Now, go to the “Accounts and Import” tab. Find the section titled “Check mail from other accounts” and click on “Add a mail account.”
Entering Hostinger Email Details
A new window will pop up. Here, enter your Hostinger email address. Click “Next.” You will be asked to choose the method to link your email. Select “Import emails from my other account (POP3).” Click “Next” again.
Next, you need to enter your Hostinger email details. This includes your username, password, and POP Server. Usually, the POP Server is “mail.yourdomain.com.” Make sure the port is set to 995. Check the box that says “Always use a secure connection (SSL) when retrieving mail.” Click “Add Account.”
You will be asked if you want to send mail as your Hostinger email. Select “Yes,” then click “Next Step.” Follow the prompts to complete the setup. Now, your Gmail account will fetch emails from your Hostinger email. Enjoy seamless email management.
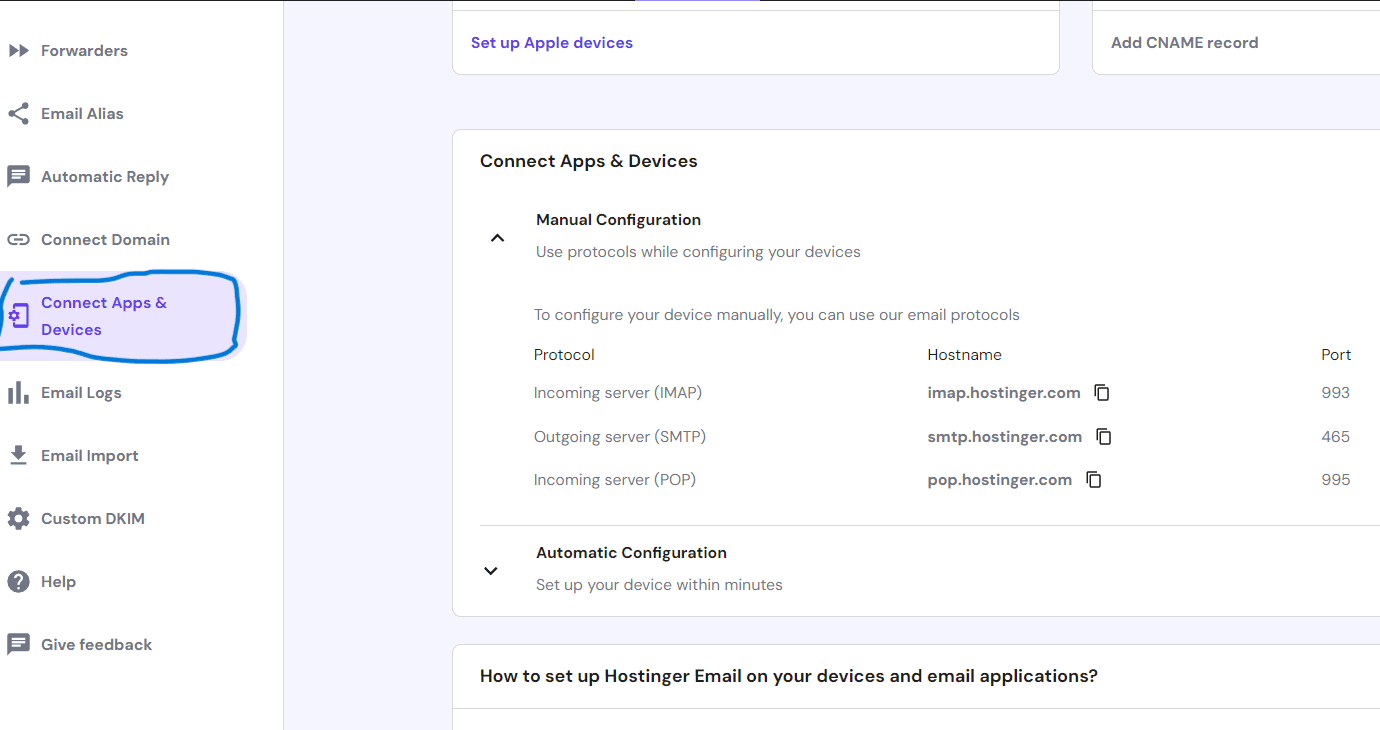
Configuring Pop3/imap Settings
Configuring your Hostinger email in Gmail requires setting up either POP3 or IMAP. These protocols help your email client communicate with your mail server. Choosing the right one depends on how you want to manage your emails. Let’s dive into the details.
Choosing Between Pop3 And Imap
POP3 and IMAP are both email protocols. POP3 downloads emails from the server to your device. It then deletes them from the server. This is great if you access email from one device. IMAP, on the other hand, stores emails on the server. This allows access from multiple devices. Choose IMAP if you use several devices. Choose POP3 if you use just one.
Inputting Server Information
To set up your Hostinger email in Gmail, you need to input the server details. Here is the required information for each protocol:
| Setting | POP3 | IMAP |
|---|---|---|
| Incoming Mail Server | pop.hostinger.com | imap.hostinger.com |
| Port | 995 | 993 |
| Encryption | SSL/TLS | SSL/TLS |
| Outgoing Mail Server | smtp.hostinger.com | smtp.hostinger.com |
| Port | 465 | 465 |
| Encryption | SSL/TLS | SSL/TLS |
- Open Gmail and go to Settings.
- Select “Accounts and Import”.
- Click “Add a mail account”.
- Enter your Hostinger email address and click “Next”.
- Choose either POP3 or IMAP.
- Input the server information from the table above.
- Enter your password and click “Add Account”.
Ensure all fields are correct. This will ensure your email functions properly. Once configured, you can start sending and receiving emails.
Sending Emails From Hostinger Via Gmail
Sending emails from Hostinger via Gmail ensures smooth communication. Integrate your Hostinger email with Gmail to use Gmail’s interface. Follow these steps to set it up easily.
Setting Up Smtp Server
To send emails from Hostinger via Gmail, you need to set up the SMTP server. Here’s how:
- Open your Gmail account and go to Settings.
- Click on the Accounts and Import tab.
- Under Send mail as, click Add another email address.
- Enter your Hostinger email address and click Next Step.
- In the SMTP Server field, enter smtp.hostinger.com.
- Set the Port to 465 or 587.
- Enter your Hostinger email address as the Username.
- Enter your Hostinger email password as the Password.
- Choose Secured connection using SSL and click Add Account.
Testing Email Sending
Now it’s time to test if everything is set up correctly:
- Compose a new email in Gmail.
- From the From dropdown menu, select your Hostinger email address.
- Send a test email to yourself or a friend.
- Check if the email is received successfully.
If the email is received, your setup is complete. If not, check your SMTP settings and try again. Now you can enjoy sending emails from Hostinger via Gmail effortlessly.
Managing Hostinger Emails In Gmail
Managing Hostinger emails in Gmail is straightforward. This guide shows how to organize your emails and set up filters and labels. Let’s streamline your email management for a more efficient workflow.
Organizing Emails
To keep your inbox tidy, use Gmail’s organization tools. Begin by creating folders (labels in Gmail).
- Click the More option on the left sidebar.
- Scroll down and select Create new label.
- Name your label and click Create.
Now, move emails into these labels. Drag and drop emails to the labels. This keeps your inbox clean and helps you find emails quickly.
Setting Up Filters And Labels
Filters automatically organize incoming emails. Follow these steps to create a filter:
- Click the Show search options icon in the Gmail search bar.
- Enter your filter criteria (e.g., email address, subject).
- Click Create filter.
- Select actions like Apply the label and choose a label.
- Click Create filter again.
This ensures that emails from specific senders or with certain subjects are automatically labeled. Use filters to manage your inbox efficiently.
Labels in Gmail act like folders. They help categorize your emails. Here’s how to create and use them:
| Step | Action |
|---|---|
| 1 | Go to Settings (gear icon) and select See all settings. |
| 2 | Navigate to the Labels tab. |
| 3 | Scroll down to Labels section and click Create new label. |
| 4 | Name your label and click Create. |
Use labels to sort your emails. Apply labels manually or through filters. This keeps your emails organized and easy to find.
Credit: hostwizly.com
Troubleshooting Common Issues
Encountering issues while using Hostinger email in Gmail can be frustrating. Don’t worry, though. Many users face common problems. Let’s dive into how to solve these issues.
Email Sync Problems
Sometimes, your Hostinger email may not sync with Gmail. This can halt your communication.
- First, check your internet connection. A weak connection can cause sync issues.
- Next, ensure your IMAP settings are correct. Go to your Gmail settings and verify the IMAP configuration.
- If the problem persists, check your spam or junk folder. Sometimes, emails may land there.
For further troubleshooting, clear your browser cache. Restarting your browser can also help. If none of these solutions work, contact Hostinger support.
Authentication Errors
Authentication errors can prevent you from accessing your Hostinger email in Gmail. This often occurs due to incorrect login details.
- Double-check your email address and password. Ensure there are no typos.
- Next, verify that you are using the correct server settings. The incoming mail server should be imap.hostinger.com and the outgoing mail server should be smtp.hostinger.com.
- Enable “less secure apps” in your Gmail account settings. This allows Gmail to connect with external email services like Hostinger.
If you still face issues, try resetting your password. Follow the reset link provided by Hostinger. Once done, update your Gmail settings with the new password.
| Setting | Value |
|---|---|
| IMAP Server | imap.hostinger.com |
| SMTP Server | smtp.hostinger.com |
| Port | IMAP: 993, SMTP: 465 |
These steps should help you troubleshoot common issues. Stay patient, and you will have your Hostinger email running smoothly in Gmail.
Enhancing Email Security
Securing your Hostinger email within Gmail is crucial. It protects your sensitive data from unauthorized access. Implementing robust security measures can help you safeguard your communication. Below are some vital steps to enhance email security.
Enabling Two-factor Authentication
Two-Factor Authentication (2FA) adds an extra layer of protection. It requires not only your password but also a second form of verification. This could be a code sent to your phone or an app-generated code.
- Log in to your Gmail account.
- Go to Settings.
- Select Accounts and Import.
- Click on Other Google Account settings.
- Choose Security from the left menu.
- Under Signing in to Google, click 2-Step Verification.
- Follow the on-screen steps to set up 2FA.
2FA ensures that only you can access your email. Even if someone steals your password, they can’t access your account without the second verification.
Monitoring Suspicious Activity
Regularly monitor your email for any suspicious activity. This could include logins from unusual locations or unfamiliar devices.
| Action | Description |
|---|---|
| Check Recent Activity | Review recent sign-ins in your Gmail account settings. |
| Enable Security Alerts | Get notified if there are any suspicious login attempts. |
| Review Connected Devices | Make sure all devices connected to your account are recognized. |
By keeping an eye on your account activity, you can quickly detect and address any potential security issues.

Credit: www.hostinger.com
Frequently Asked Questions
How To Add Hostinger Email To Gmail?
To add Hostinger email to Gmail, go to Gmail settings. Click on “Accounts and Import”. Then, add your Hostinger email address. Follow the prompts to complete the setup.
Can I Use Hostinger Email With Gmail?
Yes, you can use Hostinger email with Gmail. You need to configure your Hostinger email in Gmail settings. This allows you to send and receive emails from your Hostinger email account directly in Gmail.
What Are The Smtp Settings For Hostinger Email?
The SMTP settings for Hostinger email are: SMTP Server: smtp. hostinger. com, Port: 587, Security: TLS/SSL. Use your full Hostinger email address and password for authentication.
How To Receive Hostinger Emails In Gmail?
To receive Hostinger emails in Gmail, set up your Hostinger email in Gmail settings. Use the correct POP3 or IMAP settings from Hostinger. This will sync your emails to your Gmail inbox.
Conclusion
Connecting Hostinger email to Gmail is straightforward and efficient. This method saves time and keeps your emails organized. Follow the steps outlined, and enjoy seamless email management. Remember, practice makes perfect. You’ll get the hang of it quickly. Stay patient, and soon it will feel second nature.
Happy emailing!
