

Using Onestream Live is straightforward. This tool lets you stream pre-recorded videos live across multiple platforms.
Live streaming has become a powerful way to reach audiences. Onestream Live stands out by allowing users to stream pre-recorded content as if it were live. This feature is perfect for businesses and content creators who want to maintain a live presence without always being online.
You’ll learn the steps to use Onestream Live effectively. From setting up your account to scheduling your streams, we will cover all the essentials. By the end, you will be ready to engage your audience with ease.

Credit: www.youtube.com
Introduction To Onestream Live
Onestream Live simplifies live streaming across multiple platforms. Easily schedule and broadcast pre-recorded videos to engage your audience. Follow straightforward steps to set up and manage your streams efficiently.
Onestream Live is a powerful tool for live streaming. It allows you to broadcast your content across multiple platforms. This makes your content accessible to a wider audience. It is user-friendly and packed with features.
What Is Onestream Live?
Onestream Live is a live streaming service. It supports streaming to over 40 social media platforms. Users can stream live or pre-recorded videos. It offers scheduling, which is convenient for planning ahead. This tool also provides analytics to track your performance. It is designed to be easy to use.
Importance Of Live Streaming
Live streaming is crucial for engagement. It connects you directly with your audience. This form of content is more interactive. It allows real-time communication. People can comment and ask questions live. This creates a sense of community. Live streaming also boosts visibility. Platforms often prioritize live content. This means your streams can reach more people. It is an effective way to share information quickly.
“`
Credit: onestream.live
Setting Up Your Account
Setting up your account on OneStream Live is the first step to streaming success. This section will guide you through creating an account and customizing your profile. Follow these steps to get started quickly and easily.
Creating An Account
To start using OneStream Live, you need to create an account. Follow these simple steps:
- Go to the OneStream Live website.
- Click on the Sign Up button at the top right corner.
- Enter your email address and create a password.
- Click on Create Account.
- Check your email for a verification link and click on it.
Once you verify your email, you can log in and start exploring OneStream Live.
Customizing Your Profile
After creating your account, you can customize your profile to make it stand out. Here’s how:
- Log in to your OneStream Live account.
- Click on your profile picture at the top right corner.
- Select Profile Settings from the dropdown menu.
- Upload a profile picture. Make sure it’s a clear image.
- Fill out your bio with information about yourself or your brand.
- Include links to your social media profiles.
- Save your changes by clicking on the Save button.
Customizing your profile helps viewers recognize you and learn more about you. It also adds a personal touch to your account.
Navigating The Dashboard
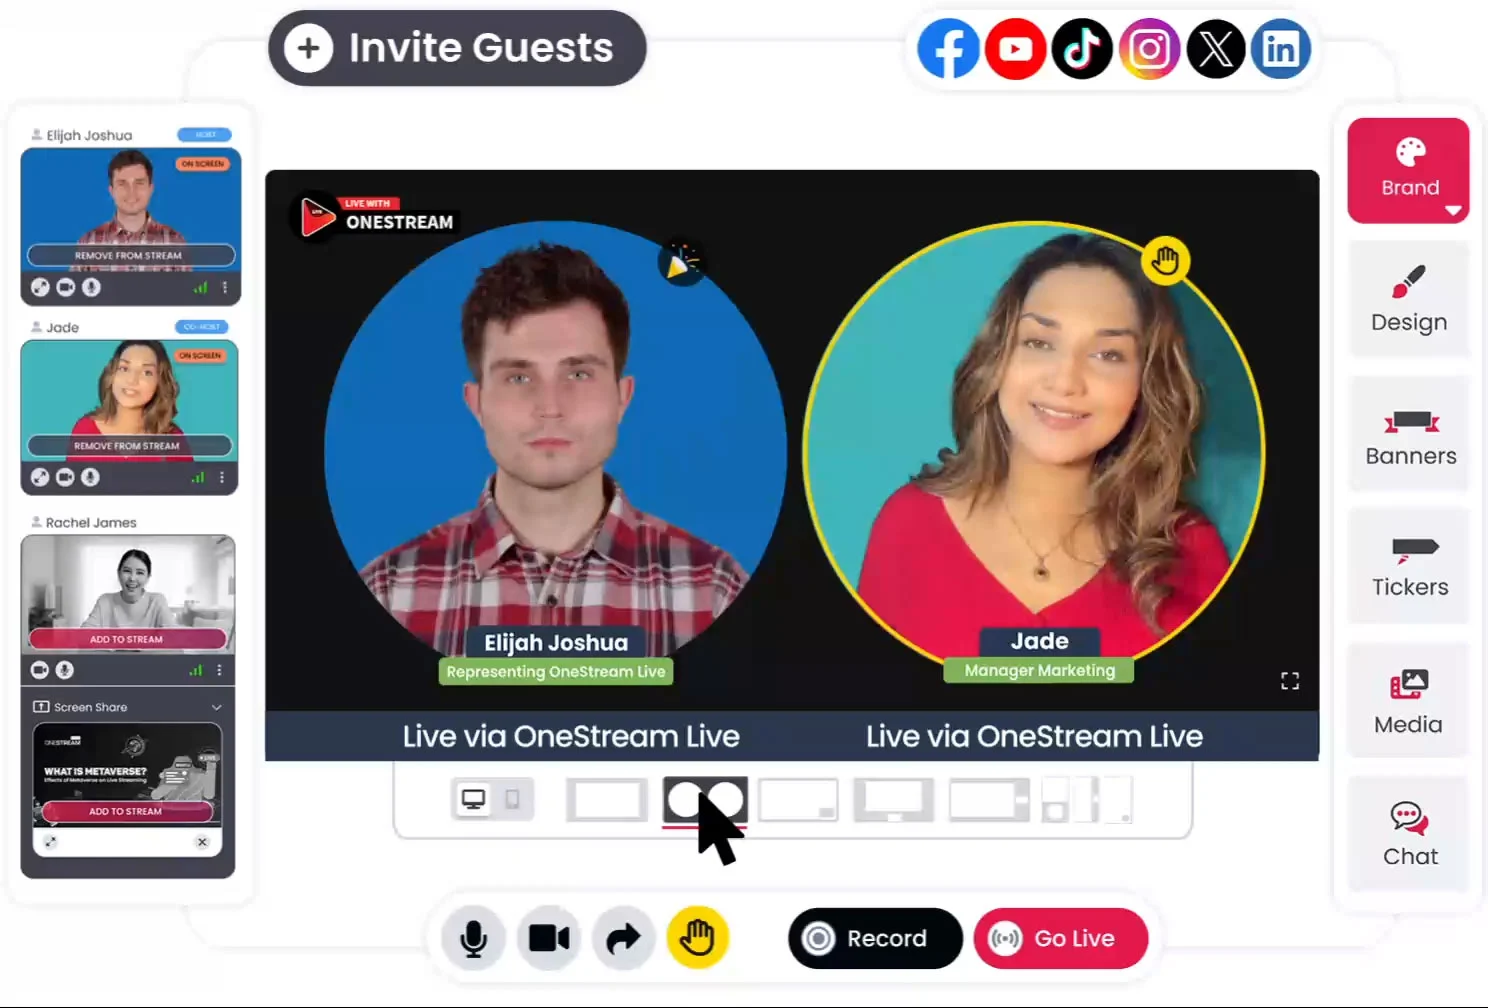
Onestream Live is a powerful platform for streaming across multiple channels. Navigating the dashboard can be straightforward with a bit of guidance. Let’s dive into the details of the dashboard to make your experience smoother.
Overview Of Dashboard Features
The dashboard is the control center of Onestream Live. Here, you can access all the main features:
- Stream Scheduling – Plan your streams in advance.
- Live Streams – Manage ongoing broadcasts.
- Recorded Streams – Upload and schedule pre-recorded videos.
- Analytics – Monitor the performance of your streams.
- Settings – Customize your streaming preferences.
Each feature is designed to enhance your streaming experience. Knowing where everything is will save you time and effort.
Understanding The Interface
The interface of Onestream Live is user-friendly. It has a clean layout that helps you find what you need quickly.
The main sections of the interface include:
| Section | Description |
|---|---|
| Left Sidebar | Contains navigation links to different features. |
| Top Bar | Shows notifications and account settings. |
| Main Area | Displays detailed information and options for selected features. |
Using these sections effectively will make your streaming process efficient.
Here are some tips for navigating the interface:
- Use the Left Sidebar for quick access to features.
- Check the Top Bar for important updates.
- Focus on the Main Area for detailed options and settings.
By following these tips, you will become proficient in using Onestream Live.
Preparing Your Live Stream
Before going live with Onestream Live, you need to prepare. Proper preparation ensures your stream runs smoothly. It also engages your audience better. Here are some key steps to get started.
Choosing Your Content
Selecting the right content is crucial. Think about what your audience wants to see. Educational content works well. So does entertainment. Make sure your content is clear and engaging. This keeps your viewers interested.
Setting Up Equipment
Good equipment makes a difference. Start with a quality camera. It ensures your video looks professional. A good microphone is also important. Clear audio keeps your audience engaged. Lighting matters too. Proper lighting improves video quality.
Check your internet connection. A stable connection prevents interruptions. Test everything before you go live. This helps avoid technical issues during the stream. A smooth setup makes your live stream more enjoyable for viewers.
Scheduling A Live Stream
Scheduling a live stream on Onestream Live is easy. Proper scheduling helps your audience know when to tune in. It also gives you time to prepare. Here’s a step-by-step guide to scheduling your live stream.
Selecting Date And Time
First, choose a date and time for your live stream. Think about your audience. Find a time that suits them. Check your calendar too. Avoid conflicts with other events.
Onestream Live allows you to pick any date and time. Use the calendar tool in the app. Click on the date you want. Then, select the time. Confirm your choice. Simple, right?
Creating A Streaming Plan
Next, create a streaming plan. Think about what you want to share. Write down key points. This keeps your stream focused. Plan how long you will stream. Your audience will appreciate this.
Also, decide on your streaming platform. Onestream Live supports many platforms. Choose the one best for your audience. You can even stream to multiple platforms at once.
Finally, prepare your content. Make sure everything is ready. This includes your camera, microphone, and any visuals. A well-prepared stream looks professional. Your audience will notice.
Going Live
Going live on Onestream Live can be an exciting experience. It allows you to connect with your audience in real-time. This guide will show you how to start your stream and engage with your viewers effectively.
Starting Your Stream
Before starting your stream, ensure your equipment is ready. This includes your camera, microphone, and internet connection. Follow these steps to go live:
- Log in to your Onestream Live account.
- Click on the “Go Live” button.
- Choose your streaming platform (e.g., Facebook, YouTube).
- Set up your stream title and description.
- Check your camera and microphone settings.
- Click on “Start Streaming”.
Once you go live, you will see your viewers joining. Make sure to greet them and start your content delivery smoothly.
Engaging With Your Audience
Engaging with your audience is key to a successful live stream. Here are some tips:
- Greet new viewers and mention their names.
- Ask questions to involve your audience.
- Read and respond to comments.
- Use a friendly and conversational tone.
- Show appreciation for their participation.
Use these tips to make your live stream interactive. This will keep your audience engaged and coming back for more. Remember, the more you interact, the more connected your viewers will feel.
Post-stream Activities
After your live stream ends on Onestream Live, your work is not over. Post-stream activities are essential to ensure ongoing success. These activities help you understand your performance and connect with your audience better. They are crucial for improving future streams and keeping your community engaged.
Reviewing Performance Metrics
Once your stream ends, review your performance metrics. Onestream Live provides detailed analytics. Look at the number of viewers, watch time, and engagement levels. Identify which parts of your stream had the most interaction. This data helps you understand what works well and what needs improvement. Use these insights to plan your next stream.
Interacting With Viewers
Engage with your viewers after the stream. Thank them for watching and participating. Respond to their comments and questions. This helps build a loyal community. You can also ask for feedback. Knowing what your audience likes or dislikes is valuable. It helps you create better content in the future.
Advanced Features
OneStream Live offers several advanced features that can elevate your live streaming experience. These features provide more control, flexibility, and reach for your broadcasts.
Using Pre-recorded Videos
OneStream Live allows you to use pre-recorded videos for your streams. This feature helps you maintain a consistent schedule. Upload your video, set the date and time, and let OneStream handle the rest. This way, you can engage your audience even when you are not live. It ensures that your content reaches your viewers at the right time.
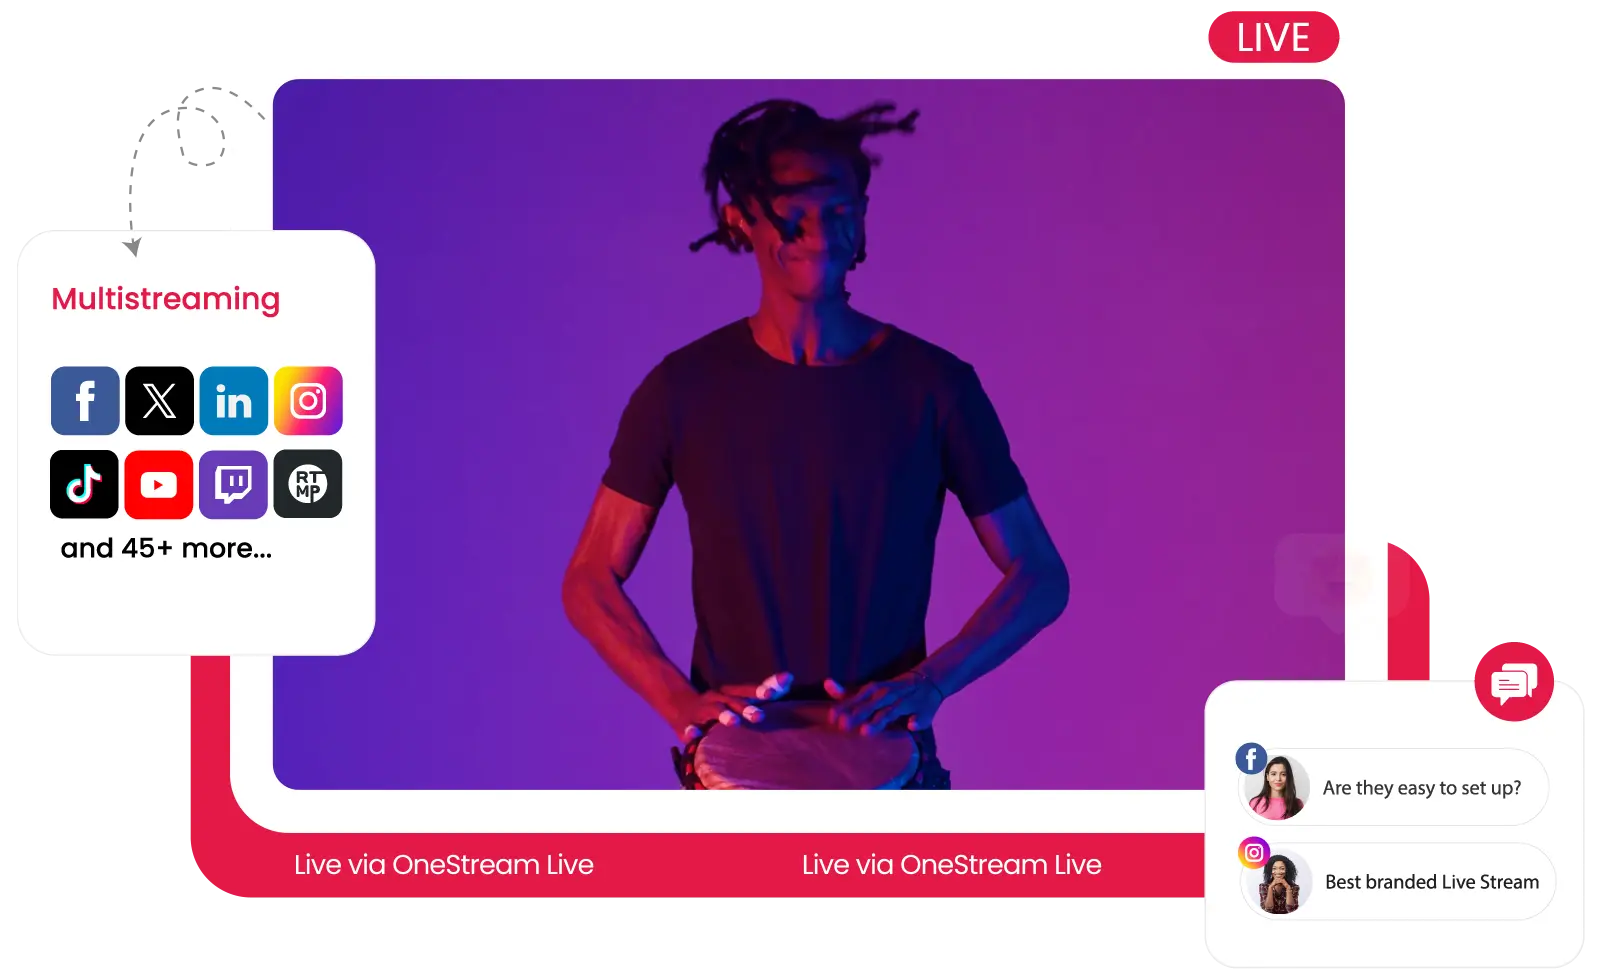
Multi-platform Streaming
With OneStream Live, you can stream to multiple platforms simultaneously. This feature increases your reach without extra effort. You can go live on YouTube, Facebook, and Twitch at the same time. Connect your accounts, and you are ready to stream everywhere. This saves time and helps you engage with diverse audiences.
Tips And Best Practices
Using Onestream Live effectively requires some tips and best practices. These can help ensure your streams are of high quality and reach a wider audience. Let’s explore some essential tips to make the most out of Onestream Live.
Ensuring High-quality Streams
High-quality streams keep your audience engaged. First, invest in a good camera and microphone. Clear visuals and crisp audio make a big difference. Also, check your internet connection. A stable connection prevents buffering and interruptions. Test your setup before going live. This helps identify and fix issues early.
Lighting is crucial too. Use natural light or softbox lights. Proper lighting makes your stream look professional. Organize your content well. Plan what you will say and do. This keeps the stream focused and interesting. Use a clean and simple background. Avoid clutter to keep the focus on you.
Growing Your Audience
To grow your audience, consistency is key. Stream regularly and at the same time. This helps build a loyal following. Promote your streams on social media. Tell your followers when you will go live. Use catchy titles and descriptions. This attracts more viewers.
Engage with your audience during the stream. Respond to comments and questions. This builds a sense of community. Collaborate with other creators. Joint streams can introduce you to their audience. Use keywords and tags. This improves your stream’s visibility in searches.
Credit: onestream.live
Troubleshooting Common Issues
Encountering issues while using Onestream Live can be frustrating. Knowing how to troubleshoot common problems can save you time and stress. Here’s a guide to help you navigate through technical difficulties and optimize your stream for the best experience.
Technical Difficulties
Technical issues can disrupt your streaming experience. First, check your internet connection. A stable connection is essential for smooth streaming. If the internet is slow, try restarting your router.
Next, ensure your software is up to date. Outdated software can cause compatibility issues. Also, check for any updates from Onestream Live.
Audio problems often stem from microphone settings. Make sure your microphone is correctly connected and configured. Check the audio levels in the settings menu.
Video quality issues can occur if your camera settings are incorrect. Ensure your camera is properly connected. Adjust the resolution settings for a clearer picture.
Stream Optimization
Optimizing your stream is crucial for a seamless experience. Start by adjusting the bitrate. A higher bitrate can improve video quality but requires more bandwidth.
Choose the right resolution for your stream. Higher resolutions offer better quality but need more resources. Balance quality and performance for the best results.
Monitor your stream’s performance. Use the Onestream Live dashboard to keep an eye on metrics. This helps identify any issues early.
Minimize background applications. Close any unnecessary programs running on your computer. This frees up resources for your stream.
Consider using a wired connection. Wi-Fi can be unstable, affecting your stream quality. A wired connection provides a more stable and reliable internet connection.
Frequently Asked Questions
What Is Onestream Live Used For?
Onestream Live is used for live streaming across multiple platforms. It helps in broadcasting pre-recorded and real-time videos.
How Do You Start Using Onestream Live?
To start using Onestream Live, sign up on their website. Then, connect your social media accounts and schedule your live stream.
Can I Stream To Multiple Platforms?
Yes, Onestream Live allows streaming to multiple platforms simultaneously. This includes Facebook, YouTube, and LinkedIn.
Is Onestream Live Free?
Onestream Live offers both free and paid plans. The free plan has limitations, while the paid plans provide more features.
Conclusion
Mastering Onestream Live is simple with practice. This tool can elevate your streaming efforts. It integrates well with various platforms. Start with basic features and build up from there. Consistency is key. Share engaging content regularly. Keep your audience engaged and informed.
The more you use it, the easier it gets. Happy streaming!
