

Configuring Hostinger Mail in Outlook is a straightforward process. You can do it by following simple steps.
Using Hostinger Mail with Outlook boosts your productivity. It combines Hostinger’s reliable email services with Outlook’s robust features. This guide will walk you through the configuration process step by step. By the end, you will have your Hostinger Mail working seamlessly in Outlook.
Whether you are a novice or an expert, this guide will help you. So, let’s get started on setting up your Hostinger Mail in Outlook and streamline your email management.
Requirements
Setting up Hostinger Mail in Outlook is a straightforward process. Before starting, ensure you have all the requirements. These include a Hostinger account and the Outlook application. Having these will make the configuration process smooth and hassle-free.
Hostinger Account
First, you need a Hostinger account. This account provides access to your email settings. Ensure your email is active and you can log in. Check your email credentials. You will need them for the setup.
Outlook Application
Next, make sure you have the Outlook application installed. It can be on a computer or mobile device. The application should be up to date. This helps avoid compatibility issues. If you don’t have it, download and install the latest version.
Credit: www.hostinger.com
Accessing Hostinger Mail Settings
Configuring Hostinger Mail in Outlook can streamline your email management. Before diving into Outlook settings, you need to access your Hostinger mail settings. This step-by-step guide will help you get started.
Login To Hostinger
First, you need to log in to your Hostinger account. Follow these simple steps:
- Go to the Hostinger website.
- Click on the “Login” button at the top right corner.
- Enter your email and password.
- Click on the “Login” button again to access your dashboard.
Navigate To Email Settings
Once you’re logged in, you need to locate the email settings. Here’s how:
- In your dashboard, find the “Emails” section.
- Select the domain for which you want to configure the email.
- Click on “Email Accounts” to see your existing email accounts.
- Choose the email account you want to configure with Outlook.
- Click on the “Setup Devices” button next to the chosen email account.
You will see the necessary settings for configuring your email with Outlook. This includes the incoming server and outgoing server details. Make sure to note them down.
| Setting | Value |
|---|---|
| Incoming Server (IMAP) | imap.hostinger.com |
| Outgoing Server (SMTP) | smtp.hostinger.com |
| IMAP Port | 993 |
| SMTP Port | 587 |
With these settings in hand, you can now proceed to configure your email account in Outlook. Stay tuned for the next steps on how to add these details in Outlook.
Gathering Email Configuration Details
Configuring Hostinger Mail in Outlook begins with gathering email configuration details. These details are crucial for a smooth setup. Knowing the right information helps prevent errors and ensures your email works correctly. Below, we break down the two main components: Incoming Mail Server and Outgoing Mail Server.
Incoming Mail Server
The Incoming Mail Server manages your received emails. You need to know the server address, port, and encryption type. For Hostinger Mail, the server address often follows a format like “imap.hostinger.com” or “pop.hostinger.com”. The port depends on your preference between IMAP and POP protocols. Commonly, IMAP uses port 993 with SSL, while POP uses port 995 with SSL.
Outgoing Mail Server
The Outgoing Mail Server handles the emails you send. Similar to the incoming server, you need the server address, port, and encryption type. The typical server address for Hostinger is “smtp.hostinger.com”. The SMTP port usually used is 465 with SSL or 587 with TLS. Correctly entering these details ensures your emails send without issues.

Credit: www.youtube.com
Setting Up Outlook
Setting up your Hostinger email in Outlook is straightforward. You’ll need to follow some steps to get your email up and running. This guide will help you configure your Hostinger email in Outlook with ease.
Opening Outlook
First, open the Outlook application on your computer. If you haven’t installed Outlook yet, download and install it from the official Microsoft website.
After opening Outlook, you might see a welcome screen if this is your first time setting it up. If not, you can proceed to add a new account.
Navigating To Account Settings
Next, you need to navigate to the Account Settings menu. Follow these steps:
- Click on File at the top-left corner of the screen.
- In the menu that appears, select Account Settings and then click on Manage Profiles.
- In the new window, click on Email Accounts.
Now, you will see the Account Settings window where you can add a new email account.
Adding A New Email Account
Setting up your Hostinger email in Outlook is a simple process. It ensures you manage all your emails efficiently in one place. Follow these steps to add a new email account and get started.
Manual Setup
First, open Outlook on your computer. Click on the File tab at the top left corner. Then, select Add Account. A new window will appear, prompting you to enter your email address.
Instead of entering your email, click on the Manual setup or additional server types option. This allows you to configure the settings manually, ensuring accurate configuration for your Hostinger email.
Entering Configuration Details
Next, you will need to enter the server settings for your Hostinger email. Here is the configuration you need:
| Setting | Details |
|---|---|
| Account Type | IMAP |
| Incoming Mail Server | imap.hostinger.com |
| Outgoing Mail Server (SMTP) | smtp.hostinger.com |
| Port Number (IMAP) | 993 |
| Port Number (SMTP) | 587 |
| Encryption Method | SSL/TLS |
Enter these details carefully. Ensure there are no typos. Then, enter your full Hostinger email address and password when prompted. Click Next to proceed.
Outlook will test the configuration. If everything is correct, you will see a success message. Click Finish to complete the setup.
Testing The Configuration
Testing the configuration is a vital step after setting up Hostinger Mail in Outlook. This ensures that your email settings are correct and that you can send and receive emails without any issues. Follow these steps to confirm everything is working as expected.
Sending A Test Email
First, open Outlook and compose a new email. Enter your email address in the recipient field. Write a simple subject line like “Test Email”. In the body, type a short message like “This is a test email.” Click the send button to dispatch the email.
Wait a few moments and check your inbox. If the test email appears, your configuration is likely correct. This simple test checks if your outgoing mail server is set up properly.
Troubleshooting Common Issues
If the test email does not appear, you may need to troubleshoot. Double-check your incoming and outgoing server settings. Ensure that the server names, ports, and security settings are correct.
Another common issue is incorrect login credentials. Verify that your email address and password are entered correctly. If you still face issues, try restarting Outlook and your computer. Sometimes, a simple restart can fix connectivity problems.
If none of these solutions work, contact Hostinger support. They can help you resolve any advanced issues with your email configuration.
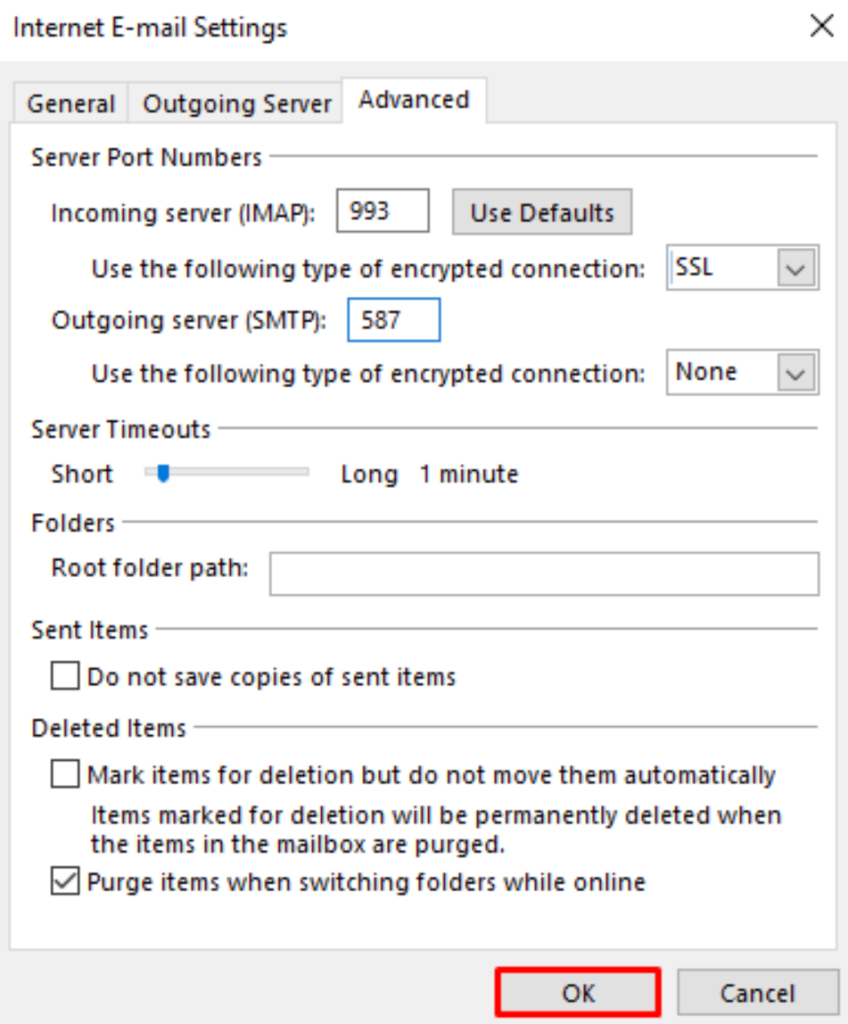
Advanced Settings
Configuring Hostinger Mail in Outlook is straightforward. To ensure it runs smoothly, adjusting advanced settings is key. These settings help you manage security and synchronization for a seamless email experience. Let’s dive into the advanced settings you need to configure.
Security Settings
Security is crucial for your email account. In Outlook, go to the Account Settings. Click on the email account you want to configure. Select “More Settings” and navigate to the “Advanced” tab. Ensure you use SSL/TLS encryption for both incoming and outgoing mail. This keeps your email secure from hackers.
For the incoming server (IMAP or POP3), use port 993 with SSL. For the outgoing server (SMTP), use port 465 with SSL. This ensures both your emails and login details are safe. Always check the box that says “This server requires an encrypted connection.”
Synchronization Settings
Synchronization settings help keep your emails updated across all devices. In the “Advanced” tab, look for the “Folders” section. Here, you can choose which folders to synchronize. Select the folders important to you. This includes inbox, sent items, and drafts.
By default, Outlook syncs every 30 minutes. You can adjust this frequency under the “Send/Receive” settings. Shorter intervals keep your emails up-to-date. Longer intervals save bandwidth. Choose what works best for you.
Ensure the “Download shared folders” option is unchecked unless you need it. This speeds up synchronization and reduces server load. Keeping these settings optimized ensures a smooth email experience.

Credit: www.youtube.com
Frequently Asked Questions
How To Add Hostinger Mail To Outlook?
To add Hostinger Mail to Outlook, go to Outlook settings. Select ‘Add Account,’ enter your Hostinger email address, and follow the prompts.
What Are Hostinger Mail Server Settings?
Hostinger Mail server settings include IMAP/POP3 server and SMTP server details. You can find them in your Hostinger account under ‘Email Accounts’ settings.
Why Isn’t Hostinger Mail Syncing In Outlook?
If Hostinger Mail isn’t syncing in Outlook, check your server settings. Ensure they match Hostinger’s recommended settings. Also, verify your internet connection.
Can I Use Hostinger Mail On Multiple Devices?
Yes, you can use Hostinger Mail on multiple devices. Configure each device with the correct IMAP settings for seamless access.
Conclusion
Setting up Hostinger Mail in Outlook is simple with the right steps. Follow the guide for a smooth process. Double-check settings for any issues. Enjoy seamless email management with Outlook. Stay organized and keep communication flowing effortlessly. Your Hostinger Mail is now ready for use in Outlook.
Happy emailing!
