
To access Bluehost cPanel, log in to your Bluehost account. Then, navigate to the cPanel section from your dashboard.
Bluehost is a popular web hosting service known for its user-friendly interface and reliable performance. Whether you’re a beginner or an experienced webmaster, managing your website can be straightforward with Bluehost’s cPanel. This control panel allows you to handle various aspects of your site, such as files, databases, and email accounts.
Understanding how to get to Bluehost cPanel is crucial for effective website management. In this guide, we’ll walk you through the steps to access it effortlessly. Let’s get started on making your website management tasks simpler and more efficient.
Prerequisites
Before accessing the Bluehost cPanel, you need to have some basic things ready. This section covers what you need to prepare.
Bluehost Account
First, ensure you have a Bluehost account. You must sign up for a hosting plan on Bluehost’s website. Without an account, you cannot access the cPanel.
If you do not have an account yet, visit Bluehost and choose a hosting plan that suits your needs. After signing up, you will receive a confirmation email.
Login Credentials
Next, you need your login credentials. These are the username and password you set up when creating your Bluehost account. Keep these details safe.
If you forget your login details, click on the “Forgot Password” link on the login page. Follow the instructions to reset your password.
| Requirement | Description |
|---|---|
| Bluehost Account | You need to sign up for a hosting plan. |
| Login Credentials | Your username and password for accessing your account. |
With these prerequisites ready, you can proceed to access your Bluehost cPanel. This will allow you to manage your hosting account and website efficiently.

Credit: www.bluehost.com
Logging Into Bluehost
Logging into Bluehost is the first step to managing your hosting account. Whether you are a beginner or a seasoned user, accessing the cPanel in Bluehost is straightforward. This guide will walk you through the steps of logging into your Bluehost account, ensuring you can easily navigate to the cPanel.
Accessing The Login Page
To get started, you need to visit the Bluehost login page. Open your web browser and go to www.bluehost.com. Once there, look for the “Login” button at the top right corner of the homepage. Click on it to proceed to the login screen.
Entering Your Credentials
On the login screen, you will see two fields: one for your username or domain, and one for your password. Enter your Bluehost username or your domain name in the first field. Next, type in your password in the second field.
If you have forgotten your password, click on the “Forgot Password” link below the login fields. Follow the instructions to reset your password. Once you have entered your credentials, click the “Login” button to access your Bluehost account.
Successfully logging in will take you to the Bluehost dashboard. From here, you can easily navigate to the cPanel by clicking on the “Advanced” tab in the left-hand menu. The cPanel provides you with all the tools needed to manage your website, such as email accounts, file management, and database handling.
Navigating To Cpanel
Getting to your Bluehost Cpanel can seem tricky at first. But with a few simple steps, you can navigate there easily. This guide will show you how to find and use Cpanel on Bluehost. Follow these steps to manage your website effectively.
Finding The Advanced Tab
First, log in to your Bluehost account. Then, look for the menu on the left side. Find the “Advanced” tab in this menu. Click on it to proceed. This tab gives you access to many tools and settings.
Accessing Cpanel Directly
Once you click the “Advanced” tab, you will see the Cpanel option. Click on the Cpanel icon. This will take you directly to the Cpanel dashboard. From here, you can manage your website’s files, databases, and settings. It’s the control center for your website.
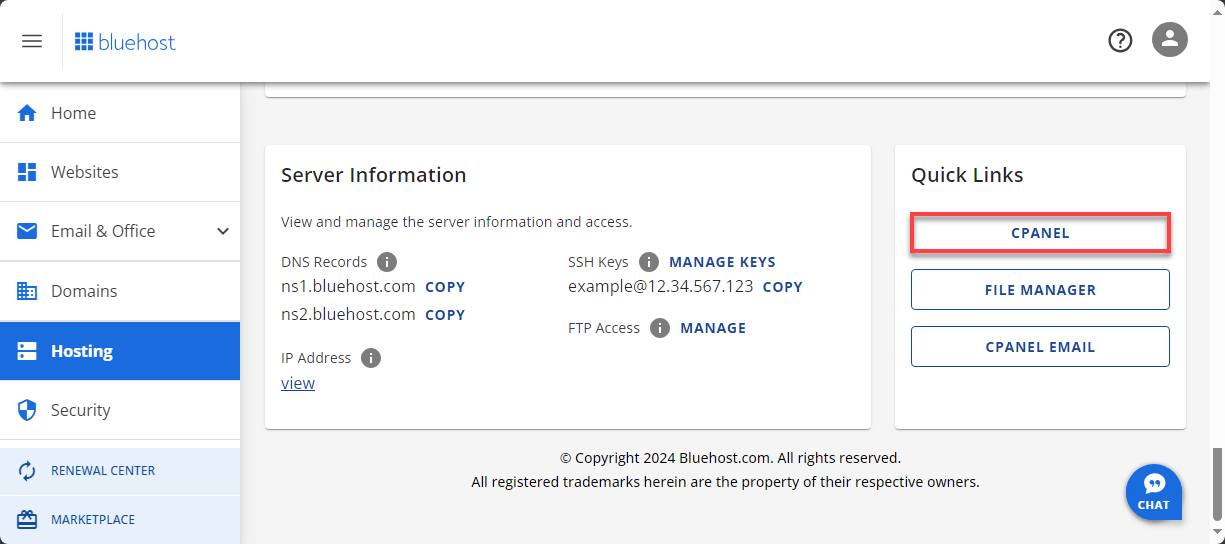
Credit: www.bluehost.com
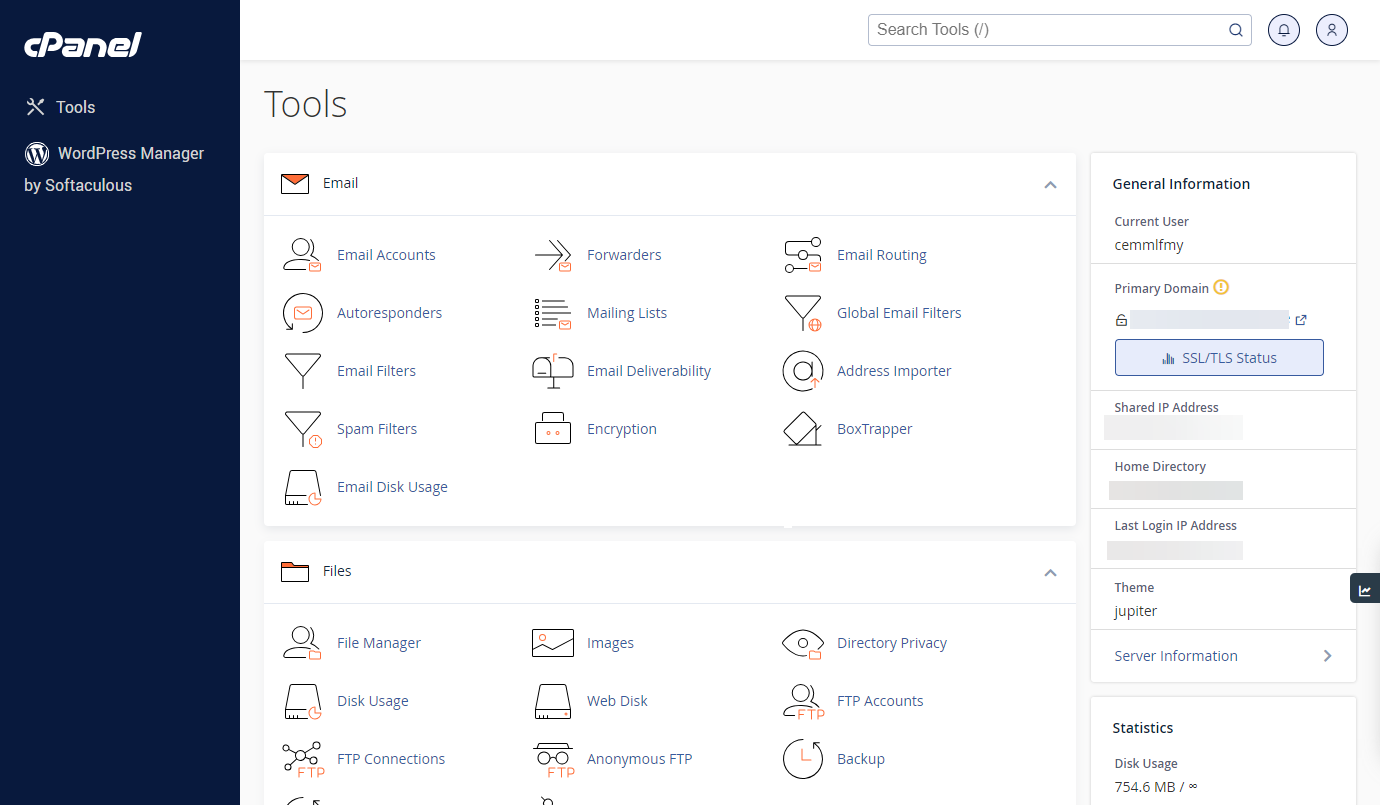
Cpanel Dashboard
The Cpanel Dashboard is the heart of your Bluehost account. This dashboard gives you access to many tools and features. It helps you manage your website with ease. Learn how to make the most of it by exploring its features and customizing your dashboard.
Overview Of Features
The Cpanel Dashboard offers many features. You can manage files, databases, and emails. There are tools for security and website backups. You can also install apps like WordPress. Each feature is designed to help you run your website smoothly.
Customizing Your Dashboard
Make your dashboard work for you. You can move widgets around. Add or remove sections based on your needs. This makes it easier to find what you use most. Personalize your dashboard to streamline your tasks. Save time and focus on growing your website.
Managing Domains
Managing domains in Bluehost’s cPanel is essential for maintaining your website’s organization. With cPanel, you can easily add new domains and manage subdomains. This guide will help you navigate through these features. Let’s dive into the specifics.
Adding A New Domain
To add a new domain, first log in to your Bluehost cPanel. Next, find the “Domains” section. Click on “Assign a Domain to Your cPanel Account.” Enter the new domain name you want to add. Choose if you want to assign a new domain or an existing one. Verify the ownership of the domain. Finally, select the addon or parked option. Click “Assign” to complete the process.
Subdomains Management
Managing subdomains is straightforward. Start from your Bluehost cPanel dashboard. Go to the “Domains” section. Click on “Subdomains.” Enter the subdomain name in the specified field. Choose the primary domain for your subdomain. Select the directory that will hold your subdomain’s files. Click “Create” to finish setting up your subdomain. You can now manage your subdomains easily.
Email Management
Managing your email accounts efficiently is crucial for maintaining professional communication. Bluehost’s cPanel makes this task simple. Here’s how to handle your email management with ease.
Creating Email Accounts
Creating email accounts in Bluehost is straightforward. Follow these steps:
- Log in to your Bluehost cPanel.
- Navigate to the Email section.
- Click on Email Accounts.
- Click the Create button.
Fill in the necessary details:
| Field | Description |
|---|---|
| Enter the desired email address. | |
| Domain | Select the domain for the email. |
| Password | Create a strong password. |
Click Create to finalize. Your new email account is ready.
Managing Email Forwarders
Email forwarders redirect emails from one address to another. This is useful for managing multiple email accounts. Here’s how to set up email forwarders:
- In your Bluehost cPanel, go to the Email section.
- Click on Forwarders.
- Click the Add Forwarder button.
Enter the forwarding details:
- Address to Forward: The email address you want to forward from.
- Destination: The email address you want to forward to.
Click Add Forwarder to complete the setup. Your emails will now be forwarded as specified.
File Management
File management is crucial for maintaining your website’s structure and content. Bluehost’s cPanel offers various tools for efficient file management. This guide will help you navigate these tools easily.
Using The File Manager
The File Manager in Bluehost cPanel is a powerful tool. It allows you to access and manage your website files directly. You can create, delete, and move files with just a few clicks.
First, log in to your Bluehost cPanel account. Next, find the “File Manager” icon under the “Files” section. Click on it to open the File Manager interface. You will see a directory tree on the left and file details on the right.
Uploading And Managing Files
Uploading files to your website is simple. In the File Manager, navigate to the folder where you want to upload the file. Click the “Upload” button at the top of the page. A new window will open, allowing you to select files from your computer.
After selecting the files, they will upload automatically. You can monitor the progress and see when the upload is complete. Once uploaded, the files will appear in the selected folder.
Managing files is equally easy. Right-click on a file to see options like “Edit,” “Rename,” or “Delete.” You can move files by dragging them to different folders. This makes organizing your website files straightforward and efficient.
Database Management
Database management is crucial for your website. It ensures data is stored and retrieved efficiently. With Bluehost cPanel, managing databases is straightforward. Here, we’ll explore creating and managing MySQL databases in Bluehost cPanel.
Creating Databases
Creating a database in Bluehost cPanel is simple. Follow these steps:
- Log in to your Bluehost account.
- Navigate to the cPanel section.
- Click on the MySQL Databases icon.
- In the Create New Database field, enter a name for your database.
- Click Create Database.
Your new database is now created and ready for use. You can view it under the Current Databases section.
Managing Mysql Databases
Managing MySQL databases in Bluehost cPanel is efficient. You can add users, set privileges, and perform other tasks:
- To add a user to a database, scroll to the MySQL Users section.
- Enter a username and password, then click Create User.
- Next, go to the Add User to Database section.
- Select the user and database from the dropdown menus.
- Click Add, then assign user privileges.
For more detailed management, you can use phpMyAdmin:
- In the cPanel, click on the phpMyAdmin icon.
- Select the database you want to manage.
- Perform operations like importing/exporting data, running SQL queries, and optimizing tables.
These tools make database management in Bluehost cPanel efficient. You can easily keep your website’s data organized and accessible.
Security Features
Keeping your website secure is crucial. Bluehost Cpanel offers several security features to help you. These tools protect your data and keep your website safe from threats.
Enabling Ssl Certificates
SSL Certificates encrypt data between your site and its visitors. This makes it harder for hackers to steal information. Follow these steps to enable an SSL Certificate in Bluehost Cpanel:
- Log into your Bluehost account.
- Navigate to the Cpanel.
- Find the Security section.
- Click on SSL/TLS.
- Select the domain you want to secure.
- Click Install.
Once installed, your site will show the HTTPS prefix. This signifies a secure connection.
Setting Up Two-factor Authentication
Two-Factor Authentication (2FA) adds an extra layer of security. It requires a second form of identification. This could be a code sent to your phone or an app-generated code. Here’s how to set it up:
- Log into your Bluehost account.
- Go to the Security section.
- Click on Two-Factor Authentication.
- Follow the on-screen instructions.
- Verify your identity through the chosen method.
2FA helps protect your account even if your password is compromised. It is a simple yet effective way to enhance your site’s security.
| Feature | Purpose |
|---|---|
| SSL Certificates | Encrypts data between site and visitors |
| Two-Factor Authentication | Adds an extra layer of security |
Troubleshooting
Getting to the Bluehost Cpanel can sometimes be tricky. Problems may occur, leaving you frustrated. This section addresses common issues and how to resolve them.
Common Issues
One frequent issue is incorrect login details. Ensure your username and password are correct. Another problem is browser cache. Clear your cache and cookies to fix this. Sometimes, the server might be down. Check the Bluehost status page for updates.
Contacting Support
If you cannot solve the problem, contact Bluehost support. They are available 24/7. You can reach them by phone, live chat, or email. Provide detailed information about your issue. This helps them assist you faster. Having your account details ready can also speed up the process.
Credit: www.bluehost.com
Frequently Asked Questions
How Do I Log Into Bluehost Cpanel?
To log into Bluehost cPanel, first visit the Bluehost website. Then, click on ‘Login’ at the top right. Enter your credentials and click ‘Log In’. You will be redirected to your Bluehost dashboard. From there, click on ‘Advanced’ to access cPanel.
What Is The Bluehost Cpanel Url?
The direct URL for accessing Bluehost cPanel is https://my. bluehost. com/web-hosting/cplogin. Alternatively, you can log in via the Bluehost website. Use your account credentials to access the cPanel dashboard from there.
How Do I Reset My Cpanel Password?
To reset your cPanel password, log into your Bluehost account. Navigate to ‘Profile’ and then ‘Password’. Enter your current password, then your new password. Confirm the new password and save changes. Your cPanel password will be updated.
Where Can I Find My Cpanel Username?
Your cPanel username is typically your Bluehost account username. You can find it in your welcome email or account dashboard. If you can’t find it, contact Bluehost support for assistance.
Conclusion
Accessing Bluehost cPanel is easy with these steps. Start by logging into your account. Then, locate and click on the “Advanced” tab. You’ll find the cPanel option there. This guide helps you manage your website efficiently. Remember to bookmark your cPanel for quick access.
Practice these steps a few times to get comfortable. Soon, navigating Bluehost cPanel will become second nature.
